Get Started
Welcome to a new way to build Flutter Apps with the Vyuh Framework. The concepts here are simple and you will soon be in a position to build large scale apps with minimal effort.
1. Let’s Start
Section titled “1. Let’s Start”Now that you have some understanding of the core concepts, let’s dig in to build our first feature with the Vyuh Framework.
Install Flutter
Section titled “Install Flutter”We assume you already have Flutter installed 😇. If not, you can always go to Flutter.dev and install it 🔗. Go through the steps outlined over there and have your Flutter setup ready.
Creating your Project
Section titled “Creating your Project”We will create the standard Flutter Application project and take off from there. On your Command Shell, run the following command in the directory where you want your project.
flutter create vyuh_demoNext we need to add a few packages for the framework. Run this command in your project directory:
flutter pub add vyuh_core vyuh_feature_developer go_router mobx flutter_mobxNow that you have the basics, we can start focusing on building a Feature.
2. Create a Feature
Section titled “2. Create a Feature”Vyuh based applications are a collection of Features. Each feature is a
descriptor which describes the feature with name, title, routes, an
init-function, etc. The mandatory ones are name, title and routes. Let’s
go ahead and define a feature.
Create the feature.dart file
Section titled “Create the feature.dart file”Create a file, under /lib, called feature.dart and put the following code in
it:
import 'package:flutter/material.dart';import 'package:flutter_mobx/flutter_mobx.dart';import 'package:go_router/go_router.dart';import 'package:mobx/mobx.dart';import 'package:vyuh_core/vyuh_core.dart';
final feature = FeatureDescriptor(  name: 'counter',  title: 'The classic Flutter counter',  description: 'A simple counter that tracks the number of button presses',  icon: Icons.add_circle_outlined,  routes: () async {    return [      GoRoute(          path: '/counter',          builder: (context, state) {            return const _Counter();          }),    ];  },);
Let’s take a moment to call out a few things:
FeatureDescriptoris a way to describe a single feature. Think of it like a manifest of all things exposed by this feature. For now we will just create theroutes.- The
routesfield is an async function that returns an array of thego_routerroutes. This means, everything you know aboutgo_routeris all you need to work with routes. We don’t use any proprietary packages anywhere in the framework and leverage the best community voted packages frompub.dev.
Create the _Counter widget
Section titled “Create the _Counter widget”Your dart analyzer would have already complained that you haven’t included the
implementation for the _Counter widget. Let’s add that next.
In the same feature.dart file, add the following code below the feature
field.
class _Counter extends StatefulWidget {  const _Counter();
  @override  State<_Counter> createState() => _CounterState();}
class _CounterState extends State<_Counter> {  final counter = 0.obs();
  @override  Widget build(BuildContext context) {    return Scaffold(      appBar: AppBar(title: const Text('Counter')),      body: Column(        mainAxisAlignment: MainAxisAlignment.center,        crossAxisAlignment: CrossAxisAlignment.stretch,        children: [          const Text(            'Number of Button presses',            textAlign: TextAlign.center,          ),          Observer(              builder: (_) => Text(                    '${counter.value}',                    style: Theme.of(context)                        .textTheme                        .displayLarge                        ?.apply(fontFamily: 'Courier New', fontWeightDelta: 2),                    textAlign: TextAlign.center,                  )),        ],      ),      floatingActionButton: IconButton.filled(        icon: const Icon(Icons.add),        onPressed: () => runInAction(() => counter.value++),      ),    );  }}
In the above code, you will notice that we are using MobX for state management. This is not mandatory, and you are free to use any state management technique you like.
Disclaimer
The creator of the Vyuh Framework has also created MobX.dart in the past. So its natural to use MobX for all state management 😇.
3. Running the app with the feature
Section titled “3. Running the app with the feature”Now we have the counter-feature ready, it’s time to invoke the runApp
method of the Vyuh Framework. Let’s go back to the main.dart file in your
project and replace it with these lines:
import 'package:flutter/material.dart';import 'package:vyuh_core/vyuh_core.dart' as vc;import 'feature.dart';
void main() async {  WidgetsFlutterBinding.ensureInitialized();
  vc.runApp(    initialLocation: '/counter',    features: () => [      feature,    ],  );}
Note that we are using /counter as our initial route. This is the same route
we have exposed earlier in the feature.
Now we have the complete app ready. Let’s run it using the following command in your project directory:
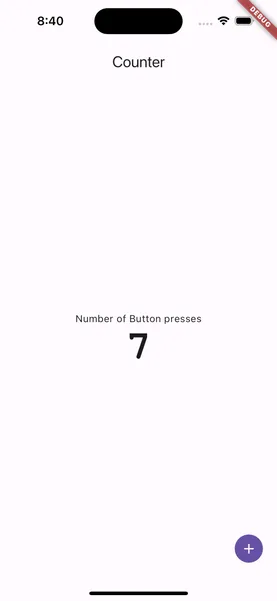
flutter runAfter a few moments, you should see an app getting launched on your chosen device or simulator. Here’s how it looks after a couple of button presses:
Summary
Section titled “Summary”If you have reached this far, we hope you were able to see a simple feature like
Counter implemented in an independent manner. With the definition of the
feature in FeatureDescriptor, you were able to assemble a simple application.
This technique is exactly the same whether you build a single feature or
hundreds of features.
Of course, as you gain more experience, you can become more sophisticated in your approach to including features conditionally or choosing to enable features for only some of your customers. The possibilities are endless.