Custom Modifier
We have seen earlier that custom layouts can be used to modify the appearance of a content item. You can create several layouts, exposed by different features across the application.
That is great for creating different layouts, but what if you want to apply the same visual behavior across all instances of a content item? Well, that is where modifiers come in.
Modifiers allow you to attach a visual behavior to every instance of a content
item, and you can configure that from the CMS with the corresponding
implementation in Flutter.
Chain of Modifiers
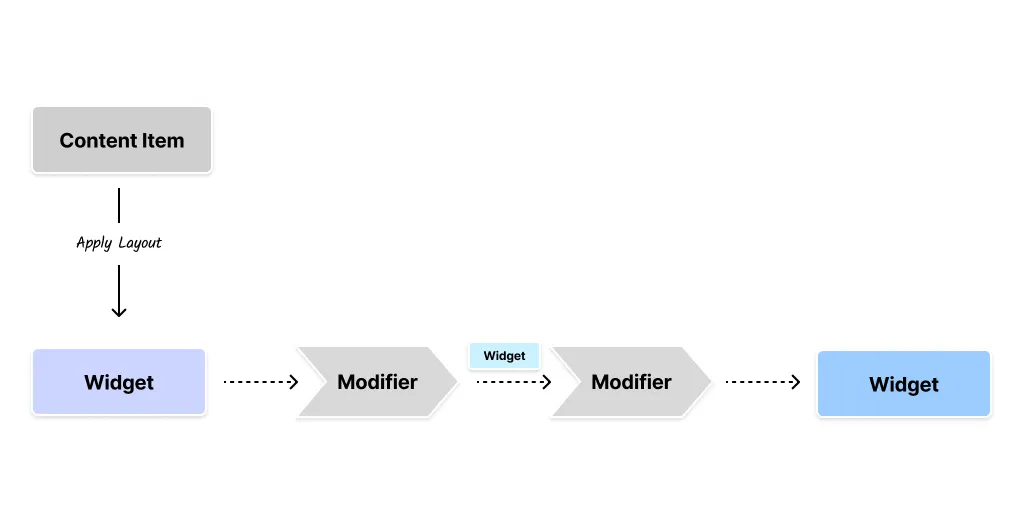
Section titled “Chain of Modifiers”Unlike layouts, there can be multiple modifiers for a content item. These can be applied as a chain with each modifier getting the output of the previous modifier.
By chaining modifiers you can get a pretty rich visual output for a specific
content item. We’ll see an example of how to use a theme-modifier to modify
the theme for the entire widget tree.

The input to the modifier is the output of the layout for the content-item,
which is the Widget. Each modifier can modify the Widget and pass it on to
the next modifier in the chain. The output of the last modifier is the final
Widget that is rendered on the screen.
You can combine the power of Modifiers, Dependency Injection, and Layouts to create a rich visual experience for your content items. This is where the true power of Vyuh lies.
The modifiers can construct a tree that can leverage State-management via
Dependency Injection, InheritedWidgets, custom Layout of the ContentItem,
and other Flutter features to create a powerful visual experience.
The core abstractions of Vyuh are designed to be composable and extensible for achieving any of your visual requirements.
Implementing a Custom ThemeModifier
Section titled “Implementing a Custom ThemeModifier”Flutter allows us to change the themes of certain widget trees by using a
Theme widget at the right places. This allows us to have a different theme
altogether for a widget subtree compared to the one for the entire application.
This is the perfect use case for a Modifier that can come in and wrap the layout widget for the content item with a Theme widget. The code for this is pretty simple and can be listed entirely over here.
import 'package:flutter/material.dart';import 'package:json_annotation/json_annotation.dart';import 'package:vyuh_core/vyuh_core.dart';import 'package:vyuh_feature_system/vyuh_feature_system.dart';
part 'theme_modifier.g.dart';
@JsonSerializable()final class ThemeModifier extends ContentModifierConfiguration { static const schemaName = 'vyuh.content.modifier.theme';
static final typeDescriptor = TypeDescriptor( fromJson: ThemeModifier.fromJson, schemaType: schemaName, title: 'Theme Modifier', );
final ThemeMode mode;
ThemeModifier({this.mode = ThemeMode.light}) : super(schemaType: schemaName);
factory ThemeModifier.fromJson(Map<String, dynamic> json) => _$ThemeModifierFromJson(json);
@override Widget build(BuildContext context, Widget child, ContentItem content) { final service = vyuh.di.get<ThemeService>(); final themeData = service.theme(mode);
return themeData != null ? Theme(data: themeData, child: child) : child; }}This is a simple modifier that takes a ThemeMode as input and wraps the child
widget with a Theme widget. The Theme widget is constructed using a
ThemeData object that is fetched from a ThemeService. Somewhere else in the
app, you would have a ThemeService that is pre-configured for the light and
dark ThemeMode.
You can see how we are combining the output of the layout with the modifier to
create a themed-widget-tree. In the process, we also leverage Dependency
Injection to fetch the ThemeService that provides the ThemeData object.
This modifier can be configured from the CMS with the
modeparameter.
Specifying Modifiers in the FeatureDescriptor
Section titled “Specifying Modifiers in the FeatureDescriptor”For the modifiers to show up in your CMS and also work on the Flutter side, you
need to specify them inside a FeatureDescriptor. This can be seen below.
CMS Configuration
Section titled “CMS Configuration”On the CMS side, we have configured the theme-modifier with light, dark, and
a system mode.
import { defineType } from 'sanity'import { FaPalette as Icon } from 'react-icons/fa6'
export const themeModifier = defineType({  name: 'vyuh.content.modifier.theme',  type: 'object',  title: 'Theme',  icon: Icon,  fields: [    {      name: 'mode',      title: 'Mode',      type: 'string',      initialValue: 'light',      options: {        list: [          { title: 'Light', value: 'light' },          { title: 'Dark', value: 'dark' },          { title: 'System', value: 'system' },        ],      },    },  ],  preview: {    select: {      mode: 'mode',    },    prepare(selection: any) {      return {        title: 'Theme',        subtitle: `Mode: ${selection.mode ?? 'light'}`,      }    },  },})
We then include this in the FeatureDescriptor like so:
import { FeatureDescriptor } from '@vyuh/sanity-schema-core'import { themeModifier } from './content-modifiers/theme'
export const system = new FeatureDescriptor({ name: 'system', title: 'System', description: 'Core System feature of the framework',
// rest of the configuration
contentModifiers: [themeModifier],})Flutter Configuration
Section titled “Flutter Configuration”On the Flutter side, we have its counterpart in the
ThemeModifier.typeDescriptor.
import 'theme_modifier.dart';
final feature = FeatureDescriptor( name: 'system', title: 'System', description: 'The core building blocks of the framework', icon: Icons.hub, init: () async { vyuh.di.register(ThemeService()); },
// Rest of the configuration
extensions: [ ContentExtensionDescriptor( contentModifiers: [ ThemeModifier.typeDescriptor, ], ), ],);With these two configuration in place, the ThemeModifier will work its magic
on the content items. The resulting rendered version can be seen in the
following section.
In Action
Section titled “In Action”
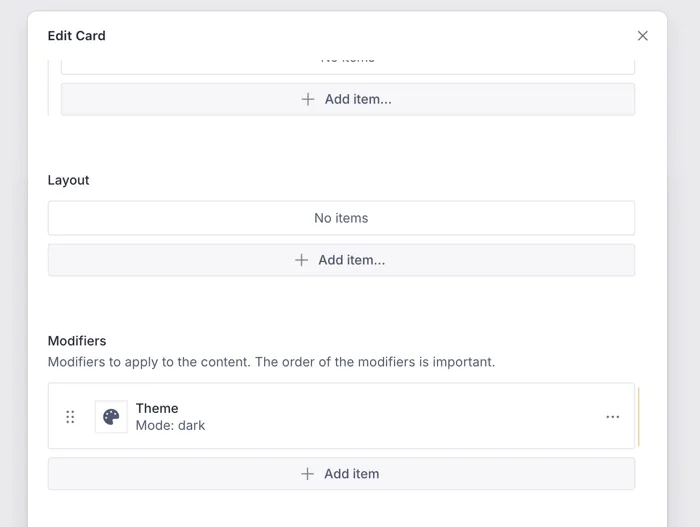
You can see the configuration for the ThemeModifier in the CMS. This is a very
simple example of how you can use a modifier to change the theme of a widget
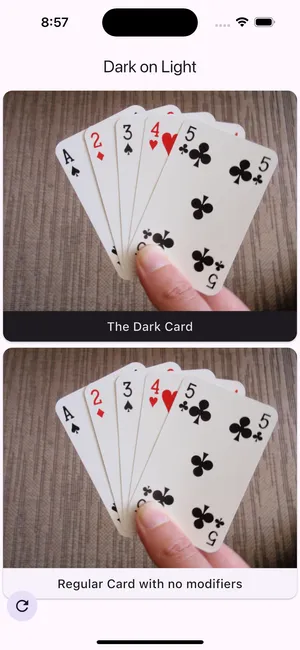
tree for a content item. In this case, we are changing the theme of a Card to
a dark theme.
While the rest of the App might be using a light theme, this content item will always render with a dark theme. This is a powerful way to apply a targeted visual change to a content item without disturbing the rest of the application UI.

Summary
Section titled “Summary”Modifiers are a powerful way to apply a visual behavior to a content item. They can be chained together to create a rich visual experience for the content item. You can use them to apply a theme, localization, or any other visual behavior that you can think of.
The power of modifiers lies in their ability to be configured from the CMS and applied to the content item in Flutter. This allows you to create a rich visual experience for your content items without having to write a lot of Flutter code.

