Vyuh CLI
The Vyuh CLI is a new tool that allows you to quickly scaffold projects,
features, schemas and content-items for the Vyuh framework. It is built on top
of the Mason package and includes a few other utilities to make it easier to
generate projects and features.
Activate the Vyuh CLI
Section titled “Activate the Vyuh CLI”The first step is to activate the ![]() package
globally. This gives you access to the
package
globally. This gives you access to the vyuh command that can be used to
generate the initial structure. Run this command in your terminal:
dart pub global activate vyuh_cliCreate your new project
Section titled “Create your new project”In the folder where you plan to build your mono-repo project for the Vyuh
Application, run the following. The <project_name> tag is the one where you
should specify your own name for the project.
vyuh create project <project_name>The above command will create a complete folder structure under <project-name>
which is described in more detail in the
Project Structure article.
More parameters
Section titled “More parameters”There are more details you can pass when creating the project as shown below:
A Vyuh Flutter project created by Vyuh CLI.
Usage: vyuh create project <project-name> [arguments]-h, --help                Print this usage information.-o, --output-directory    The desired output directory when creating a new project.    --description         The description for this new project.                          (defaults to "A Vyuh Flutter project created by Vyuh CLI.")    --cms                 The content management system for this new project.                          (defaults to "sanity")    --org-name            The organization for this new project.                          (defaults to "com.example.vyuh")    --application-id      The bundle identifier on iOS or application id on Android. (defaults to <org-name>.<project-name>)
Add a new feature
Section titled “Add a new feature”Just like the command for creating projects, we also have a
vyuh create feature <feature-name> that does very similar things in terms of
setting up a new feature for the project.
This will create a new feature package (in Flutter) inside the current folder of your shell.
Create a new Vyuh feature.
Usage: vyuh create feature <feature-name> [arguments]-h, --help                Print this usage information.-o, --output-directory    The desired output directory when creating a new feature.
Run "vyuh help" to see global options.Add a new schema
Section titled “Add a new schema”We also have the command for creating a new schema for the CMS. You can use
vyuh create schema <feature-name> to set it up.
This will create a new schema package (in Typescript) inside the current folder of your shell.
Create a new Vyuh feature CMS schema.
Usage: vyuh create schema <feature-name> [arguments]-h, --help                Print this usage information.-o, --output-directory    The desired output directory when creating a new feature.    --cms                 The content management system for this new schema.                          (defaults to "sanity")
Run "vyuh help" to see global options.
Add a new content item
Section titled “Add a new content item”The vyuh create item <item-name> command is used to create a new content item
within your Vyuh project. Content items represent individual pieces of content,
such as articles, blog posts, or product descriptions.
Create a new Vyuh ContentItem.
Usage: vyuh create item <item-name> [arguments]-h, --help                Print this usage information.-o, --output-directory    The desired output directory when creating a new item.-f, --feature             The feature to add the content item to. If not specified, the item will be created without a feature context.
Run "vyuh help" to see global options.
The <item-name> argument specifies the name of the content item to be created.
The name should be a valid Dart identifier.
The -o or --output-directory option allows you to specify the directory
where the content item will be created. If not specified, the content item will
be created in the current directory.
The -f or --feature option allows you to specify the feature to which the
content item belongs. If specified, the content item will be created within the
lib/content directory of the specified feature. If not specified, the content
item will be created in the lib/content directory of the current project.
After creating the content item, you will need to:
- Run
dart run build_runner buildto generate the JSON serialization code. - Register the
ContentBuilderin yourFeatureDescriptorwith theContentExtensionDescriptor().
Environment checks with Doctor New
Section titled “Environment checks with Doctor ”The vyuh doctor command helps you verify that your development environment is
properly set up for Vyuh development. It checks for all required dependencies
and their versions:
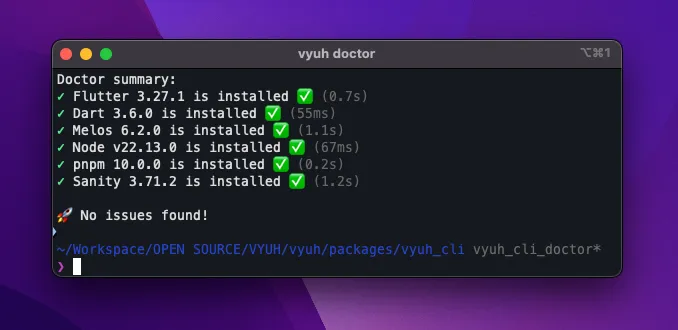
vyuh doctorThis command validates the presence and configuration of:
- Flutter SDK
- Dart SDK
- Melos (for monorepo management)
- Node.js
- pnpm (for package management)
- Sanity CLI
The command provides a detailed report of any issues found and suggestions for fixing them. It’s particularly useful when:
- Setting up a new development environment
- Troubleshooting build or runtime issues
- Ensuring your environment meets all prerequisites before creating a new project
Update the CLI
Section titled “Update the CLI”The Vyuh CLI has an inbuilt mechanism to update itself. You can run the following command to update the CLI:
vyuh updateThis will check for the latest version of the CLI and update it if necessary.
> vyuh update✓ Checked for updates (0.7s)CLI is already at the latest version.Summary
Section titled “Summary”This guide showed you the steps to set up the Vyuh CLI on your system and use it to generate various parts of the Application. Currently, there is support for creating a new Vyuh App, a Vyuh Feature package for Flutter and a Vyuh schema package for Sanity CMS.
There will be more added in the future to accommodate other aspects of developing Vyuh Apps.